
Home Creme de Vape Blog Dealing with stuck vape parts?
Dealing with stuck vape parts?

If you’ve been vaping for a while, you’ve probably run into the frustration of a stuck part on your RTA or vape setup. Whether it’s a tank that won’t budge, a top cap that’s seized up, or a base that refuses to unscrew, stuck parts can test your patience. Over the last 16 years of dealing with vape gear, I’ve seen it all, and I’ve learned a thing or two about how to handle these situations without turning your prized atomiser into a scratched-up and un-usable mess.
First off, if you’re dealing with a seriously stuck part, my advice is to get in touch with us before you go full caveman with pliers or a spanner. Harsh tools might seem like the quick fix, but they can easily damage your gear, ie stripped threads, dented metal, or cracked glass. Nobody wants to turn a minor annoyance into a costly repair or replacement. We’ve got the experience and the right tools to sort it out safely, and we’re happy to help.
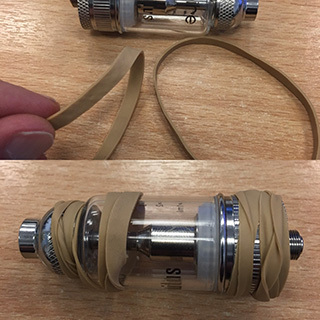
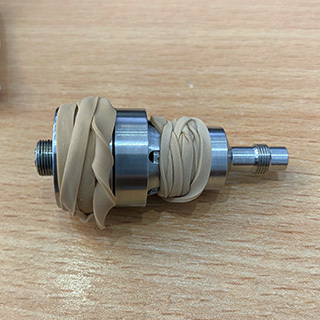
That said, if you’re determined to tackle it yourself, there’s one method that’s been my go-to for years, and it’s dead simple: a rubber band. Yep, the same kind you’d find in your junk drawer. Wrap a thick rubber band tightly around the stuck part to give your fingers extra grip. The rubber creates just enough friction to help you get a solid purchase without slipping. Twist slowly and steadily, and you’ll often find the part starts to give way. I’ve used this trick on everything from stubborn top caps to over-tightened bases, and it works like a charm nine times out of ten.
Why does this happen in the first place? Vaping gear takes a beating—juice residue, heat, and constant screwing and unscrewing can make parts stick like they’ve been welded together. RTAs, with their tight tolerances and threaded components, are especially prone to this. Over-tightening is another culprit; it’s easy to crank down too hard when you’re in a rush to refill or swap a coil. And if you’ve got liquid seeping into the threads, it can act like glue once it dries.
Tips to Prevent Stuck Parts
- Keep it clean: Regularly clean your threads and contact points with warm water and a soft cloth. Dry thoroughly to avoid residue build-up.
- Don’t over-tighten: Snug is enough—there’s no need to channel your inner Hulk when screwing parts together.
- Lube sparingly: A tiny dab of e-liquid or VG on the threads can keep things moving smoothly, but don’t overdo it, as too much can attract gunk.
- Store smart: If you’re not using an atomiser for a while, drain all e-liquid from the tank and clean it out then loosen the parts slightly to prevent them from seizing up over time.
If the rubber band trick doesn’t do the job, you’ve got a couple of other gentle options. One is to try heating the stuck part with a hairdryer for 20-30 seconds to expand the metal slightly, then give it another go with the rubber band. Another trick I’ve found handy is the freezer method. Pop the stuck component (make sure it’s dry first!) into the freezer for about 10-15 minutes. The cold can cause the metal to contract just enough to break the seal. After taking it out, wrap it with the rubber band and try twisting again. These temperature tricks—hot or cold—can often nudge things loose without risking damage. Still no luck? That’s when it’s time to reach out for professional help. We’ve got tricks up our sleeves that go beyond what most vapers have at home, and we can usually save your gear without turning it into a salvage project.
Vaping’s supposed to be enjoyable, not a wrestling match with your hardware. Stick to simple solutions like the rubber band or a quick chill in the freezer, keep your gear clean, and know when to call in the pros. Got a stuck part that’s driving you up the wall? Drop us a line—we’ll get you sorted.


Contact Us
-

Unit 7A Chiltern Court
Asheridge Road, Chesham, HP5 2PX
United Kingdom | 0845 6435860 -
 Contact Us
You must be over the age of 18 to purchase vaping products.
